
Starlight Ceiling Installation: 2026 Step-by-Step Guide for Drywall, Drop Ceilings & Home Theaters
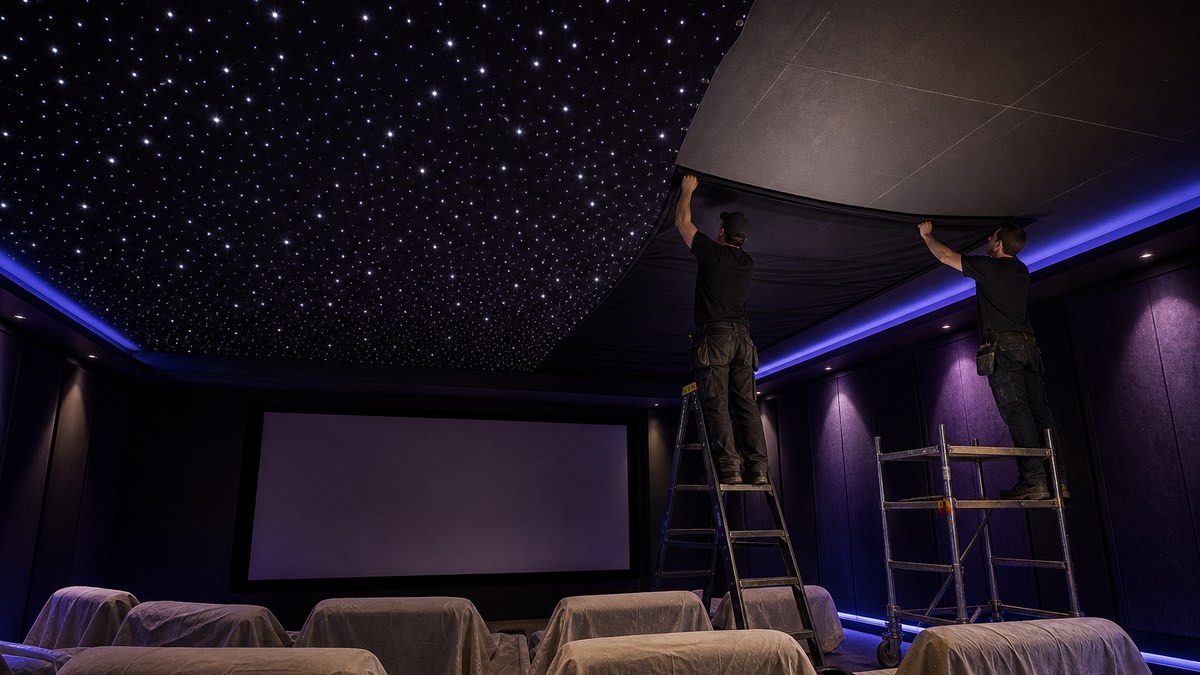
Starlight ceiling installation with premade fiber optic panels usually takes 1 to 2 days for a typical room: the crew lays out the star field, adds one power outlet at the ceiling, mounts the panels to drywall or drops them into a grid, links them with low-voltage Cat5 cable, and tests the whole sky the same day. In 2026, professional installation runs about $22 per square foot, or about $77 per square foot with the panels included.
Most people picture a star ceiling install as weeks of drilling holes and crawling through a hot attic. That's how the old hand-drilled method works, and it's still used on some custom builds. But panel-based installs have changed the job completely. At American Starlight Ceilings, most of our installs are finished before dinner on day two, with no drywall dust and no holes punched through your ceiling for stars.
This guide walks you through every step of a real starlight ceiling installation — what happens before install day, how panels go up on drywall, drop ceilings, and home theater ceilings, how long each room takes, what it costs, and how to prep your space so the job goes smoothly. If you're still choosing an installer, pair this with our guide to finding a star ceiling installer near you.
✦ Quick Answer: How Is a Starlight Ceiling Installed?
A modern starlight ceiling is installed with premade fiber optic star panels. Here's what to expect in 2026:
- Method: premade panels with fibers and an LED light engine already built in — no drilling hundreds of star holes
- Power: one outlet at the ceiling; panels link to each other with low-voltage Cat5 cable
- Speed: a 2-person crew covers 75–90 sq ft per day, so most rooms take 1–2 days
- Drywall ceilings: panels surface-mount with hardware; no attic access needed
- Drop ceilings: lay-in star tiles swap into a 2′×2′ or 2′×4′ grid with about 3–4 inches of clearance above
- Cost: about $22/sq ft for installation ($20–$24), ~$77/sq ft installed with panels — about $7,700 for a 10′×10′ field
- Warranty: 2-year product warranty plus a lifetime workmanship warranty on professional installation
Two Ways to Install a Starlight Ceiling
Before we get into the steps, it helps to know there are two very different installation methods. The method decides how long the job takes, how messy it gets, and how dense your star field looks.
Method 1: Premade fiber optic star panels
With panels, the hard work happens in a workshop. Every fiber is placed, glued, and trimmed into the panel before it ships, and the light engine is already mounted on the back. On install day, the crew only mounts and connects. Panels deliver 7–11 stars per square foot with mixed sizes and brightness, which gives you a realistic night sky instead of an even pegboard pattern. You can see full specs on our starlight ceiling panels page.
Method 2: Hand-drilled fiber optic installation
The traditional method drills a small hole for every single star, then threads fiber down through the drywall from the attic. Each strand is glued and trimmed flush. It works, but it's slow. One person often needs 5–7 full days for a single room, attics regularly pass 140°F in summer, and the finished sky usually ends up with about half the density of a panel system. Large custom builds sometimes still use this approach, and our partners at fiber optic lighting solutions handle those specialty projects.
| Factor | Premade Star Panels | Hand-Drilled Fiber |
|---|---|---|
| Install time (10′×10′) | About 1–2 days, 2-person crew | About 5–7 days, often longer |
| Attic access | Not needed | Usually required |
| Holes in your ceiling | Only mounting points | One per star — hundreds |
| Star density | 7–11 stars per sq ft | Often about half that |
| Acoustic benefit | Built in (NRC 1.0+ options) | None from the stars |
| Drywall patching | None | Often needed ($200–$600+) |
| Mess | Minimal | Dust from every drilled hole |
For the rest of this guide, we'll focus on the panel method, since that's how most homes are done in 2026. If you're weighing a hand-drilled DIY build, our DIY star ceiling cost guide breaks down the real budget for kits versus premade panels.
Before Install Day: Planning Your Star Ceiling
A smooth installation starts weeks earlier. Most of the decisions that affect how your ceiling looks are made at the planning stage, not on the ladder.
1. Measure the room and pick your coverage
Measure your ceiling length and width and multiply to get square feet. Then decide whether you want wall-to-wall stars or a center field with a plain border. A center field keeps the "wow," leaves room for lights and vents, and can cut the square footage — and the price — by 30% or more. Stars look most natural when they stop at least 8–10 inches from the walls.
2. Map everything already on the ceiling
Recessed lights, HVAC vents, smoke detectors, sprinkler heads, speakers, and projector mounts all need a home. A good installer maps them first and builds the panel layout around them. In theaters, we plan in-ceiling Atmos speakers into the border or into planned cutouts so the sound and the stars both work.
3. Plan one outlet
Panels run on low voltage and connect to each other in a daisy chain, so a whole field usually needs only one standard outlet near the ceiling or above the grid. If you don't have one, a licensed electrician can add it before install day. This is the single most common thing that delays an install, so plan it early.
4. Choose effects now, not later
White starlight with dimming is included in base panel pricing. Twinkle, shooting stars, RGB color, smart-home control, and constellation mapping are custom add-ons with extra cost, and they're much easier to plan before panels are built. Our custom starlight ceiling design team can show you what each effect looks like, and our custom star ceiling cost guide lists typical add-on prices.
Pro tip: Send your installer photos of the ceiling, the room dimensions, ceiling height, and the location of every light, vent, and speaker. With that, most quotes and panel layouts can be prepared before anyone visits your home.
Starlight Ceiling Installation: Step by Step
Here's what a professional star ceiling drywall installation looks like from the moment the crew arrives. Drop ceiling and theater differences are covered in the next sections.
Protect the room and confirm the layout
The crew covers floors and furniture, checks the ceiling for sags or damage, and confirms the panel layout against the actual room. Lights, vents, and speaker locations are marked, along with the 8–10 inch border from each wall.
Snap lines and find framing
Chalk lines mark the edges of the star field. Ceiling joists are located so mounting hardware lands in solid framing or uses rated anchors. Getting this square is what makes the finished field look crisp.
Confirm power at the ceiling
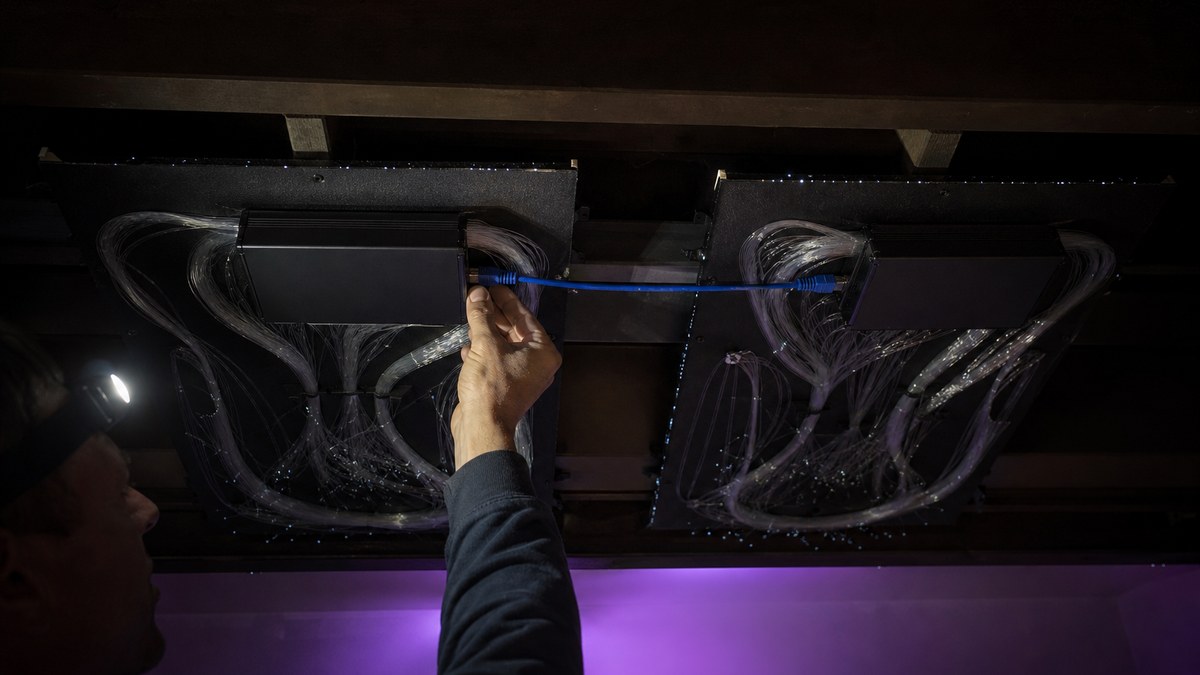
The crew checks the outlet that will feed the system and plans the Cat5 route from panel to panel. Because the system is low voltage, the links between panels are simple and hidden behind the panels themselves.
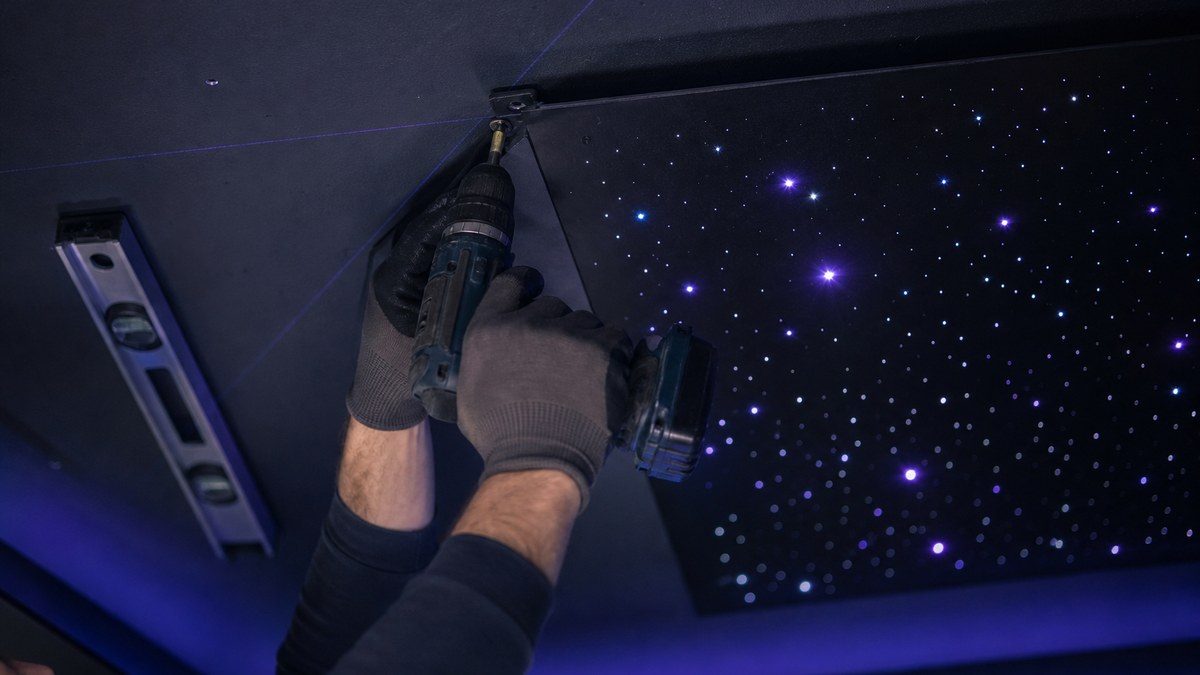
Mount the first row
Installation starts from a reference line, usually the center of the room, and works outward. Each panel attaches to the drywall with mounting hardware. No holes are drilled through the ceiling for stars — the stars are already in the panel.
Link panels with Cat5 as you go
Each panel's built-in light engine connects to the next with a Cat5 cable in a daisy chain. Connecting as you go makes it easy to test sections before the field is closed up.
Finish the field and trim edges
Remaining panels go up row by row. Cutouts are made around lights or vents where the layout calls for them, and edges are finished so the field looks like one continuous sky.
Power test, dimming, and effects
With the lights off, the crew powers the full system, checks every panel, and sets dimming. Any custom effects like twinkle or shooting stars are programmed and tested now.
Walkthrough and cleanup
You get a walkthrough of the remote or app controls, warranty details, and a clean room. There's no drywall patching, painting, or attic cleanup to deal with afterward.
Every professional install through our professional starlight ceiling installation service follows this sequence and includes a lifetime workmanship warranty on the labor.
Installing Star Ceiling Panels in a Basement Drop Ceiling
Basement star ceiling installation is often the fastest job in the house, because the grid is already there. Lay-in star tiles simply replace the old ceiling tiles. Here's what's different from a drywall install.
Check the grid size and tee width
Star tiles come in standard 2′×2′ and 2′×4′ sizes. Grids use either 15/16″ or 9/16″ tees, and tiles can have square lay-in or tegular (stepped) edges. Matching all three is what makes the new tiles sit flat and flush with the rest of the ceiling.
Confirm clearance above the grid
The panel's light engine and Cat5 connections sit on top of the tile, so you need about 3–4 inches of clearance between the grid and the joists or ductwork above. Most suspended ceilings already meet this, since standard hanger-wire installs need a minimum drop of about 3 inches.
Fix the grid before the stars go in
Star tiles are heavier than basic fiberboard tiles, so the crew checks hanger wires (typically about every 4 feet along the main runners), straightens sagging tees, and adds support where needed. Many homeowners also paint the grid black so it disappears at night. In damp basements, keeping humidity below about 60% protects both the grid and the tiles.
Drop in, connect, and test
Tiles drop into their openings, link with Cat5 on top of the grid, and connect to one outlet above the ceiling. Many basement fields are finished in a single day. For a full breakdown of grid sizes, layouts, and costs, see our star ceiling tiles for drop ceilings guide.
Installing Star Ceiling Panels in a Home Theater
Home theater installs follow the same steps, with a few extra layers of planning. This is where acoustic panels, speaker placement, and screen position all come together.
Use acoustic star panels
A drywall ceiling has an NRC (Noise Reduction Coefficient) of about 0.05, so it bounces almost all sound back into the room. Acoustic star panels with NRC 1.0+ options absorb those reflections while providing the stars, so one product handles both jobs. Keep in mind that acoustic panels improve sound inside the room — they are not soundproofing. Our acoustic star ceiling panels guide explains placement in detail.
Stop the stars before the screen
Ending the star field 2–3 feet short of the screen wall keeps light off the image and keeps the eye on the movie. It also trims square footage, which lowers cost.
Plan speakers and projector first
Share your speaker layout (for example 5.1.2 or 7.1.4) and projector mount location before the panels are built. Atmos speakers usually go in the border or in planned cutouts, and the projector mount gets reinforced framing. Learn more on our home theater starlight ceilings page, and see real budgets in our home theater star ceiling cost guide.
Theater timing tip: If your theater is new construction, schedule the star ceiling after drywall, paint, and electrical rough-in, but before seating and risers go in. That gives the crew clear floor space for ladders and keeps your seats dust-free.
How Long Does Starlight Ceiling Installation Take?
A professional 2-person crew covers about 75 to 90 square feet in an 8-hour day. Here's how that translates to real rooms.
| Room / Project | Star Field Size | Typical Install Time |
|---|---|---|
| Feature panel over a bed | 4′ × 8′ (32 sq ft) | Half a day |
| Small bedroom or nursery | 8′ × 10′ (80 sq ft) | About 1 day |
| Standard room field | 10′ × 10′ (100 sq ft) | 1–2 days |
| Basement drop ceiling field | 8′ × 12′ (96 sq ft) | Often 1 day |
| Home theater center field | 12′ × 12′ (144 sq ft) | About 2 days |
| Full home theater ceiling | 12′ × 15′ (180 sq ft) | About 2–3 days |
| Commercial space | 200–2,000+ sq ft | Scheduled per project |
Ceiling height, cutouts, sloped or vaulted surfaces, and custom shapes can add time. Prep problems, like a missing outlet or a sagging grid, are the most common reason a one-day job becomes two.
How Much Does Starlight Ceiling Installation Cost?
We always price product and labor separately so you can see exactly what you're paying for. Premade panels cost about $55 per square foot delivered. Professional installation adds about $22 per square foot (typically $20–$24, depending on height and layout), for about $77 per square foot installed.
| Project | Size | Installation Only (~$22/sq ft) | Panels + Installation (~$77/sq ft) |
|---|---|---|---|
| Feature panel | 4′ × 8′ (32 sq ft) | ~$704 | ~$2,464 |
| Small bedroom field | 8′ × 10′ (80 sq ft) | ~$1,760 | ~$6,160 |
| Standard room field | 10′ × 10′ (100 sq ft) | ~$2,200 | ~$7,700 |
| Basement drop ceiling field | 8′ × 12′ (96 sq ft) | ~$2,112 | ~$7,392 |
| Home theater center field | 12′ × 12′ (144 sq ft) | ~$3,168 | ~$11,088 |
| Full home theater ceiling | 12′ × 15′ (180 sq ft) | ~$3,960 | ~$13,860 |
These are guide ranges, not fixed quotes. Travel, very high ceilings, an added outlet, and custom effects are priced separately. Remember that twinkle ($300–$1,000+), shooting stars ($500–$2,000+), RGB color ($500–$2,000+), smart-home integration ($500–$1,500+), and constellation mapping ($1,000–$3,000+) are custom add-ons with extra cost. For every factor that moves the price, read our full starlight ceiling cost guide and our star ceiling panels price guide.
Get an Installation Plan for Your Room
Send us your room size, ceiling type, and a few photos. We'll map your panels, confirm what prep you need, and send a clear quote with product and installation priced separately.
(702) 738-2218 Get Your Free Quote →Can You Install Star Ceiling Panels Yourself?
Yes. Because the fibers and light engine are already built in, premade panels are the most DIY-friendly way to get a real fiber optic sky. If you're handy, own a good ladder, and can find joists, you can buy panels only at about $55 per square foot and follow the same steps above. This "plug and play" style of star ceiling installation is very different from threading fiber by hand.
DIY makes the most sense for small fields, drop ceilings, and single-room projects. Professional installation makes more sense for large fields, high or sloped ceilings, home theaters with speakers and projectors, and anyone who wants the lifetime workmanship warranty. Our DIY starlight ceiling kits page compares your options, and our star ceiling panels buying guide covers what to look for in the panels themselves.
DIY installation checklist
- Two people — panels are easier and safer to hold and fasten as a pair
- A stable ladder or rolling scaffold for ceilings over 9 feet
- Stud finder, chalk line, level, and drill/driver
- A confirmed outlet near the ceiling (or above the grid)
- The panel layout drawing from your supplier
- Time to test each section before closing up the field
Common Starlight Ceiling Installation Mistakes
Most problems with star ceilings start before the first panel goes up. Avoid these and your install will go smoothly.
- No outlet planned: the most common delay. Add it before install day.
- Stars too close to the walls: keep an 8–10 inch border so the sky looks natural.
- Ignoring lights, vents, and speakers: map them first, or they'll land in the middle of your stars.
- Stars over the screen: in theaters, stop the field 2–3 feet short of the screen wall.
- Sagging drop ceiling grid: fix hanger wires and tees before swapping in heavier star tiles.
- Adding effects as an afterthought: twinkle and shooting stars are easier and often cheaper to plan in from the start.
- Choosing LED dot panels: true PMMA fiber optic stars look like real pinpoints and stay clear for 20+ years, while LED dots look like dots and fail one by one.
Where Starlight Ceiling Installation Works Best
Bedrooms are the most popular room for a star ceiling — see our starlight ceiling for bedroom page for layout ideas. Home theaters and media rooms come next, followed by basements, game rooms, offices, and nurseries. Our residential starlight ceilings page covers more rooms, and our complete guide to a starlight ceiling in your house helps you choose the right space.
Businesses use star ceilings too. Restaurants, lounges, spas, and hotel suites get the same panel installation, just scheduled around opening hours — learn more about our commercial starlight ceilings. For outdoor living and water features, our partners at pool and aquatic lighting can light the rest of the property. Browse finished projects in our starlight ceiling gallery, and check our locations page for the cities we serve nationwide.
Commercial Lighting Applications From Our Network
A star ceiling is often one part of a bigger lighting project. In Texas, our partner network handles the rest of the building, including LED lighting solutions in Dallas, Fort Worth LED lighting, LED lighting in Plano, commercial LED lighting in Arlington, and Irving LED lighting services, plus Texas-wide LED lighting and wholesale LED solutions for larger jobs.
Building a new theater room, studio, or office? Modular building solutions and modular structures in Dallas can deliver the space, and we'll install the stars once it's ready.
Frequently Asked Questions About Starlight Ceiling Installation
How long does starlight ceiling installation take?
A professional 2-person crew installs about 75 to 90 square feet of premade star panels per day, so most rooms take 1 to 2 days. A 12x12 home theater center field takes about 2 days, and many basement drop ceiling fields are finished in 1 day.
How much does it cost to install a starlight ceiling?
Professional installation costs about $22 per square foot, typically $20 to $24. With premade panels at about $55 per square foot, a fully installed star ceiling runs about $77 per square foot, or about $7,700 for a 10x10 field. Custom effects are extra.
Do you need attic access to install a star ceiling?
Not with premade panels. Panels mount to the underside of a drywall ceiling or drop into a suspended grid, and the fibers and light engine are already built in. Attic access is usually only needed for hand-drilled fiber optic installs.
How are star ceiling panels installed on drywall?
The crew marks the star field, locates the joists, mounts each panel to the drywall with mounting hardware, links the panels with low-voltage Cat5 cable, and connects the system to one outlet. No holes are drilled through the ceiling for the stars.
Can star ceiling panels be installed in a drop ceiling?
Yes. Lay-in star tiles in 2x2 or 2x4 sizes replace standard tiles in a 15/16 inch or 9/16 inch grid. You need about 3 to 4 inches of clearance above the grid for the light engine and Cat5 connections, plus one outlet above the ceiling.
What power does a starlight ceiling need?
A panel-based starlight ceiling usually needs one standard outlet near the ceiling or above the grid. The panels run on low voltage and connect to each other in a daisy chain with Cat5 cable, so you do not need an outlet for every panel.
Can I install a star ceiling myself?
Yes. Premade star panels are the most DIY-friendly option because the fibers and light engine are built in. You buy panels only at about $55 per square foot, mount them, and link them with Cat5. Professional installation adds a lifetime workmanship warranty.
How do you install a star ceiling in a home theater?
Use acoustic star panels with NRC 1.0 or higher options, stop the star field 2 to 3 feet short of the screen, and plan speaker cutouts and the projector mount before the panels are built. Installation then follows the same mount, link, and test steps as any room.
Is it messy to install a starlight ceiling?
Panel installation is very clean. There is no drilling of star holes, no attic work, and no drywall patching or painting afterward. Hand-drilled fiber optic installs create dust from every hole and often need drywall repair.
What warranty comes with starlight ceiling installation?
Our star ceiling panels include a 2-year product warranty, and professional installation includes a lifetime workmanship warranty on the labor. Fiber optic strands stay clear for 20 or more years, and the LED light engine is rated for 50,000 or more hours.
Ready to Schedule Your Starlight Ceiling Installation?
Tell us about your room and we'll design your sky, map every panel, and send a clear quote with product and installation priced separately. Every professional install includes a 2-year product warranty and a lifetime workmanship warranty.
(702) 738-2218 Get Your Free Quote →